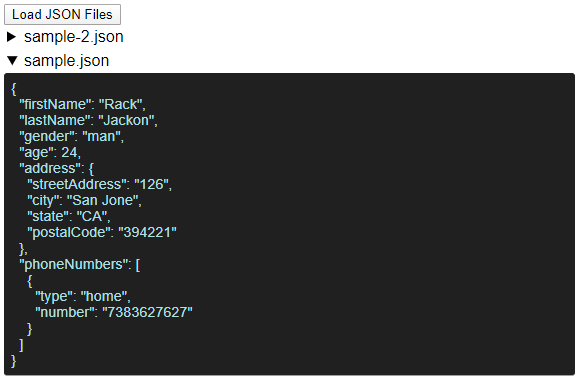
Sharing components between applications built with different frameworks is a challenge. It's often the case that a design system's component library will have separate implementations for each target framework e.g. React and Angular
One of the trending options for building sharable components is HTML Web Components - these are custom HTML elements that run natively in the browser. Stencil.js is a tool that allows us to build Web Components using technologies that we are (mostly) already familiar with: Virtual DOM, TypeScript, JSX
Stencil is a toolchain for building reusable, scalable Design Systems. Generate small, blazing fast, and 100% standards based Web Components that run in every browser - Stencil.js
In this article I'll share some the process and details of building a file input and previewer component with Stencil, and also how to integrate the component in the Angular framework

Stencil Setup
The best way to get up and running with Stencil is to follow the Getting Started Guide on the Stencil Docs website. The basic steps are initializing a new project, and generating components with the Stencil CLI
npm init stencilThis command invokes the create-stencil project, which clones a starter project under-the-hood. Choose the component option when prompted
Component Generation
Components can be generate with the following command:
npx stencil generateYou'll be asked for a dash-case component name and also to select which files to generate
JSON File Input
You'll notice the file and class names I used have the bc/BC prefix included. In hindsight this was a slight mistake, as the Stencil style guide advises that only the component tag should have a prefix, as the classes are scoped
bc-json-file-input.tsx
@Component({
    tag: "bc-json-file-input",
    styleUrl: "bc-json-file-input.css",
    shadow: true,
})
export class BcJsonFileInput implements ComponentInterface {
    @Prop() previewJson: boolean = false;

    @Prop({
        attribute: "console-log",
    })
    objectToConsole: boolean = false;

    @Prop() multiple: boolean = false;

    @State() files: File[];

    @State() previewList: ReadonlyArray<IFileData>;

    /**
     * Event emitted when files have been loaded
     *
     * @type {EventEmitter<File[]>}
     * @memberof BcJsonFileInput
     */
    @Event() filesLoaded: EventEmitter<File[]>;

    /**
     * Event emitted when files have been read (using FileReader)
     *
     * @type {EventEmitter<IFileData[]>}
     * @memberof BcJsonFileInput
     */
    @Event() filesRead: EventEmitter<ReadonlyArray<IFileData>>;

    private inputElement: HTMLInputElement;

    handleButtonClick = () => {
        this.inputElement.click();
    };

    handleInputChange = () => {
        const fileList: FileList = this.inputElement.files;
        if (!fileList || !fileList.length) return;
        this.files = Array.from(fileList);
        this.filesLoaded.emit(this.files);

        const fileProcessor = new JsonFileProcessor();
        fileProcessor.process(this.files).then((result) => {
            this.previewList = result;
            this.filesRead.emit(result);
        });
    };

    render() {
        return (
            <Host>
                <div class="click-container" onClick={this.handleButtonClick}>
                    <slot>
                        <button>Upload Files</button>
                    </slot>
                </div>
                <input
                    class="file-input"
                    type="file"
                    accept=".json"
                    multiple={this.multiple}
                    ref={(el) => {
                        this.inputElement = el;
                    }}
                    onChange={this.handleInputChange}
                />
                {this.previewJson && this.files && this.previewList && (
                    <bc-json-preview
                        previewList={this.previewList}
                        objectToConsole={this.objectToConsole}
                    ></bc-json-preview>
                )}
            </Host>
        );
    }
}
JSON File Previewer
bc-json-preview.tsx
@Component({
    tag: "bc-json-preview",
    styleUrl: "bc-json-preview.css",
    shadow: true,
})
export class BcJsonPreview implements ComponentInterface {
    @Prop() previewList: ReadonlyArray<IFileData>;

    @Prop() objectToConsole: boolean = false;

    // Note: not called on first init+render
    // Use in conjuction with componentWillLoad
    @Watch("previewList")
    previewListChanged() {
        this.logToConsole();
    }

    // Similar to Angular's ngOnInit, called once on first init
    componentWillLoad() {
        this.logToConsole();
    }

    private logToConsole() {
        if (this.previewList && this.objectToConsole) {
            this.previewList.forEach((item) => {
                try {
                    const obj = JSON.parse(item.content);
                    console.log(obj);
                } catch (err) {
                    console.warn("Problem parsing " + item.fileName, err);
                }
            });
        }
    }

    render() {
        return (
            <Host>
                {this.previewList && (
                    <div class="preview-container">
                        {this.previewList.map((data) => {
                            return (
                                <details open={false}>
                                    <summary class={{ error: data.error }}>
                                        {data.fileName}
                                    </summary>
                                    <div class="preview-pane">
                                        {data.content || ""}
                                    </div>
                                </details>
                            );
                        })}
                    </div>
                )}
            </Host>
        );
    }
}
Local Development
In the index.html of the src folder you can include your component tag to have live-reloading of the demo app during development
The following is added as the end of the body
index.html
<bc-json-file-input multiple preview-json>
    <button>Injected Button</button>
</bc-json-file-input>
<script>
    document
        .querySelector("bc-json-file-input")
        .addEventListener("filesLoaded", (ev) => {
            console.log("filesLoaded Handler", ev.detail);
        });

    document
        .querySelector("bc-json-file-input")
        .addEventListener("filesRead", (ev) => {
            console.log("filesRead Handler", ev.detail);
        });
</script>
Styling
Shadow DOM will be enabled for your components by default, so the css style files will be scoped to the component. A side effect of this is that external css cannot target your custom element components (except for the host element). A way around this is to use css variables with fallbacks
bc-json-preview.css
details {
    width: 100%;
    font-family: var(--bc-preview-font-family, sans-serif);
}
The font-family can be overridden by the exteranl page if a value is provided for the --bc-preview-font-family variable e.g.
:root {
  --bc-preview-color: powderblue;
}
Angular Integration
The Framework Integration docs will guide you on integrating your Web Component with Angular/React/Vue/JavaScript. Below are some of the basics:
Note: to test the integration before publishing your web component to npm, you can import the
defineCustomElements()function directly from the Stencil projectsloaderfolder after runningnpm build
Angular Import
Import the defineCustomEelements function from the loader module of the npm library
import { enableProdMode } from '@angular/core';
import { platformBrowserDynamic } from '@angular/platform-browser-dynamic';
import { defineCustomElements } from '@bcodes/json-file-input/loader';
import { AppModule } from './app/app.module';
import { environment } from './environments/environment';

if (environment.production) {
  enableProdMode();
}

platformBrowserDynamic()
  .bootstrapModule(AppModule)
  .catch((err) => console.error(err));

// Stencil specific
defineCustomElements();
Use In Angular Templates
import { AfterViewInit, Component, ElementRef, ViewChild } from '@angular/core';

@Component({
  selector: 'app-root',
  template: `
    <bc-json-file-input
      #inputRef
      multiple
      preview-json
      (filesLoaded)="handleFilesLoaded($event)"
    >
      <button>Load JSON Files</button>
    </bc-json-file-input>
  `,
  styleUrls: ['./app.component.css'],
})
export class AppComponent implements AfterViewInit {
  @ViewChild('inputRef') inputRef: ElementRef<HTMLBcJsonFileInputElement>;

  handleFilesLoaded(event: CustomEvent) {
    console.log('filesLoaded:', event.detail);
  }

  ngAfterViewInit() {
    console.dir(this.inputRef);
    this.inputRef.nativeElement.addEventListener(
      'filesRead',
      (event: CustomEvent) => {
        console.log('filesRead: ', event.detail);
      }
    );
  }
}
Demo & Links
- Live Demo
- Stencil Implementation: json-file-input Github
- Angular Integration: ng-stencil-json-fi Github
- npm: @bcodes/json-file-input on npm


